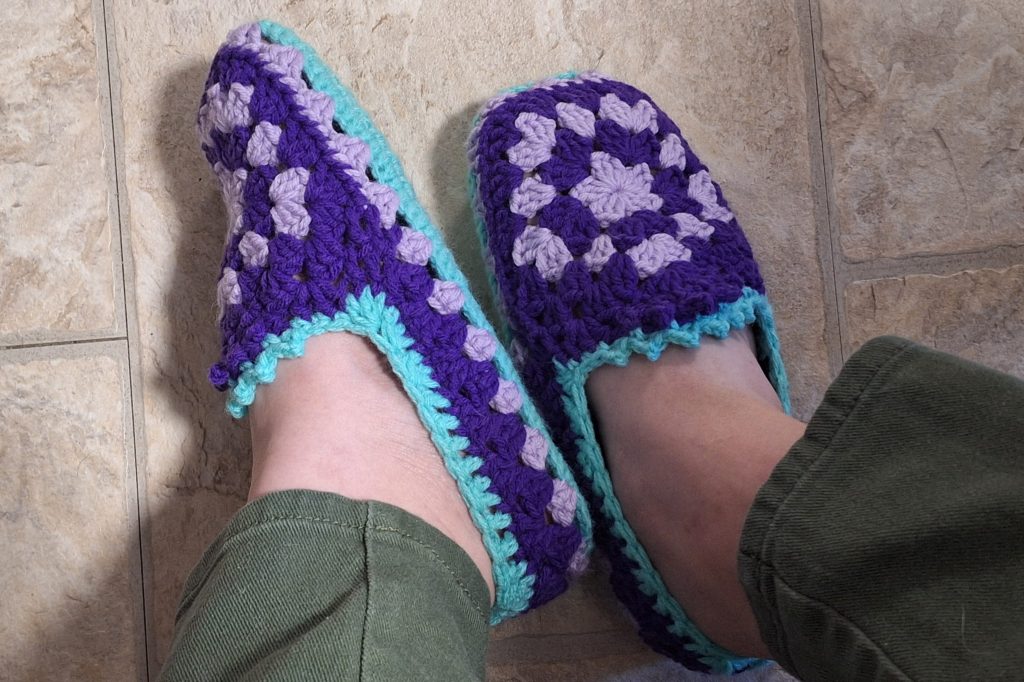

The bottom is reinforced with a double layer, but you can also add an insole if you’d like even more thickness and softness inside.
Since I designed this slipper to fit myself, the resulting slipper is approximately a women’s 7/8 or a men’s 5.5/6/5. I have only made the slippers once, for myself, and I’m honestly not sure how to resize a pattern like this, but maybe I’ll come back to it and add more sizes.
There aren’t any advanced stitches or techniques in this pattern, but it can be a lot to figure out how everything goes together and there are several colour changes, so it’s intermediate and not recommended for beginners.
Materials
- Size 4 medium acrylic yarn in Colours A, B, and C (mint, purple, lavender)
- 4mm hook
- Insoles (optional)
Abbreviations
Ch(s) = chain(s)
Inc = increase
Sc = single crochet
Sc2tog = single crochet two together
BLO = back loops only
MR = magic ring
Dc = double crochet
Picot = (chain 3, single crochet in 3rd chain)
Dc3tog = double crochet three together
Dc2tog = double crochet two together
Steps
Sole (Make 2)
Use Colour A.
Ch 7
- Inc, sc 4, inc. (8)
- Inc, sc 6, inc. (10)
- Sc 10 10x
- Inc, sc 8, inc. (12)
- Sc 12 8x
- Inc, sc 10, inc. (14)
- Sc 14 16x
- Sc2tog, sc 10, sc2tog. (12)
- Sc 12 2x
- Sc2tog, sc 8, sc2tog. (10)
- Sc 10
- Sc2tog, sc 6, sc2tog. (8)
- Sc2tog, sc 6, sc2tog. (6)
- BLO inc, sc 4, inc. (8)
- Inc, sc 6, inc. (10)
- Sc 10
- Inc, sc 8, inc. (12)
- Sc 12 2x
- Inc, sc 10, inc. (14)
- Sc 14 16x
- Sc2tog, sc 10, sc2tog. (12)
- Sc 12 8x
- Sc2tog, sc 8, sc2tog. (10)
- Sc 10 10x
- Sc2tog, sc 6, sc2tog. (8)
- Sc2tog, sc 4, sc2tog. (6)
Fold in half along BLO ridge, and continue work through both layers, working across heel first.
Sc 6 across heel, inc, sc 42 along side, inc, sc 6 across toe, inc, sc 42 along side, inc.
Fasten off.
Top Panel (Make 2)
Using Colour B, MR (dc 3, ch 1) 5x, join.
- Using Colour C, (Dc 3) in 1st ch-1 gap, *(dc 3, ch 1, dc 3) in next ch-1 gap* 4x, (dc 3, ch 1) in starting ch-1 gap, join.
- Using Colour B, (Dc 3) in 1st ch-1 gap, *(dc 3) in gap, (dc 3, ch 1, dc 3) in next ch-1 gap* 4x, (dc 3) in gap, (dc 3, ch 1) in starting ch-1 gap, join.
- Using Colour C, (Dc 3) in 1st ch-1 gap, *(dc 3) in next 2 gaps, (dc 3, ch 1, dc 3) in next ch-1 gap* 2x, *(dc 3) in next 2 gaps, (dc 3) in next ch-1 gap* 2x, (dc 3) in next 2 gaps, (dc 3, ch 1) in starting ch-1 gap, join.
Fasten off.
Sides (Make 2)
Attach Colour C to right corner of heel.
- Work *(dc 3) in st, skip 3 sts* 26x, join.
- From centre dc-3 group at tip of toe, count 5 dc-3 groups on either side. Starting from the middle dc of one of these dc-3 groups, sew Top Panel onto Sides using a whip stitch.
- Using Colour B, work (dc 3) in next 8 gaps, dc in unworked dc of dc-3 group joined to corner of Top Panel, dc into joining middle dc, dc in corner of Top Panel. *(Dc 3) in next gap of Top Panel* 2x, sc in next gap. Skip 1 dc, *picot, sc in next dc* 4x, picot, sc in next gap. (Dc 3) in next 2 gaps. Dc in corner, dc into joining middle dc, dc in next gap of Sides. (Dc 3) in next 6 gaps, join.
- (Dc 3) in next 8 gaps, dc in next gap, dc in middle dc, dc in next gap. (Dc 3) in next gap. *Sc in next sc, ch 1* 5x, sc in next sc, (dc 3) in next gap. Dc in next gap, dc in middle dc, dc in next gap. (Dc 3) in next 5 gaps, join.
- Using Colour A, dc3tog 3, dc 3, dc2tog, dc 4, dc3tog 3, sc 3, *picot, sc in next ch-1 gap* 5x, picot, sc 3, dc3tog 3, dc 4, dc2tog, dc 3, join.
Fasten off.


Leave a comment